ENG 004 Lecture 14, Nov 13, 2012
Announcements
- Homework #5 due today
- Homework #6 posted after class
- Finish reading Chapter 9
- Office Hours 5-6
Topics
Tolerances
Tolerances are the allowable deviation in size,
location, and geometry of a feature.
The primary role of dimensioning is to control the size or location of a
feature.
Every dimension has to have a tolerance associated with it: X.XX±0.02
Traditional/Size-control Tolerancing
Does not control for the form (geometry) of the feature directly, it only
controls the size or location

Traditional Tolerance Types
Bilateral

Unilateral

Limits of Size

Default Tolerances

Tolerance Zone - Size

Tolerance Zone - Location

Material Conditions
Maximum Material Condition (MMC)
Size of a feature at one end of its tolerance zone where there is the most
amount of material.
Least Material Condition (LMC)
Size of a feature at one end of its tolerance zone where there is the
least amount of material.
Material Conditions

Tolerance Stackup
Tolerances always add!
0.7±0.2 + 0.5±0.3 = 1.2±0.5
0.7±0.2 - 0.5±0.3 = 0.2±0.5

Functional Dimensioning

Functional Dimensioning

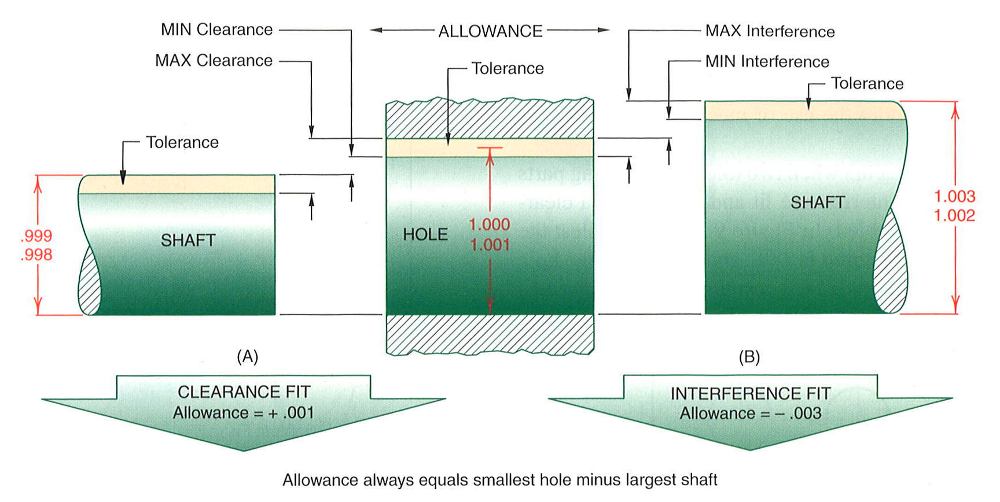
Classes of Fit
An assembly of two parts creates a "fit" whose functional characteristic
is determined by the differences in the parts' associate sizes.
Clearance Fit
The MMC of the hole is always greater than the MMC of the shaft:
MMChole > MMCshaft
Interference Fit
Both the MMC and the LMC of the hole are less than the MMC and LMC of the
shaft, respectively
MMChole < MMCshaft
LMChole < LMCshaft
Clearance and Interference

Transition Fit

Metric Fit Classifications

Metric Fit Notation

Metric Preferred Hole Based System
Minimum hole size is the basic size

Metric Preferred Shaft Based System
Minimum shaft size is the basic size

Metric Fit Note Form

English Preferred Precision Fits
Running and Sliding Fits [RC]
The loosest fits. Used when shaft must move freely in a hole. Always has
clearance, position is not critical.
Clear Locational Fits [LC]
Tighter than RC. Shaft and hole may be same size (line-to-line fit).
Location is more important than RC.
Transition Locational Fits [LT]
Transition between LC and LN. May have slight clearance or may have
slight interference.
Interference Locational Fits [LN]
Can be line-to-line, but almost always shaft is larger than the hole.
Position/location very important.
Force and shrink fits [FN]
Pure interference fits. Used to secure parts together.
English Preferred Precision Fits
Basic Size
Theoretical nominal size to which the tolerance limits are applied.
Basic Hole System
Smallest hole is set as the basic size. Most common due to drill
tooling
Basic Shaft System
Largest diameter of the shaft is assigned as the basic size. Less
popular.
Basic Hole and Shaft Systems
 ←
→
←
→
/
#


